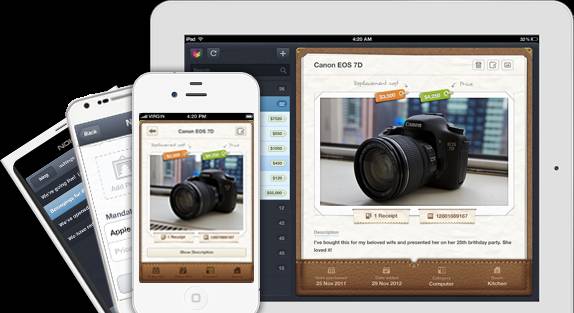
If there’s a hurricane or tornado heading your way, one of the first things you remember to do is make sure you have enough food and non-perishables on hand. The next thing that is on your list may be to have an active escape route. Outside of this, you may not have many other plans outside of this. However, one ignored plan of action in the event of a national disaster is having a working way to let insurance companies know what valuables were damaged, lost, or looted. Belongings for iOS is there to help make this process easier for you than ever.
How to Begin
Creating an account for Belongings is seamless and easy to do. To begin, after launching Belongings, all you have to do is enter your basic information (name and email), a unique password, and your county’s currency. This process can be made a lot easier by signing up through Facebook or Twitter. From here, you may want to begin adding to your inventory. After making a list of valuable items around the house, you’ll then want to do and begin searching for it in the app.
Growing Your List
If the item isn’t available by searching, you have two options. One, to enter the item manually, or two, to scan the items barcode. I highly recommend going through the barcode route first. This is easier to do because the information available is automatically applied to the inventory account. To enter information manually, simply enter the name and price. From there, you will then take a photo of the receipt. While not required, it’s highly important to have this with you for proof of purchase. Then, you’re done.
Other options available for individuals entering items into their inventory includes the ability to add the cost of replacement. For example, you may have purchased an iPhone for $xx. But since it’s a cell phone, you may have to pay three times that price for the same phone due to carrier subsidization. You can also add when you purchased it, categorize the purchase, and state where the item is kept. For example, your iMac may be in the family office.

Customize Your Belongings Online
Rooms can’t be added in the app though. They are added through your online account, where you are able to see which items don’t have a photo, a reciept, the amount of items in your inventory, and how many devices are linked to the account itself. However, you may not find yourself using the website often after getting your account fully prepared. Once the insurance company asks for a list of your belongings, the website allows you to easily export the list as a PDF, Excel, or HTML file.
After all items have been added, you can view them by category on the home page of the iPhone app. Next to each category is the amount of items in said category. At the very bottom, you can view the total cost of the items in your inventory. Clicking a category opens it up within the homepage, allowing you to view the items within the category.
More on Belongings…
Belongings is highly recommended for anyone keeping inventory of their stuff. If you are just starting out, Belongings allow you to have a working list to begin with. If you are a seasoned inventory keeper, it is very easy to transition to Belongings depending on how you kept inventory in the beginning (if it was digitally, you’ll have an easier time than if it was in a simple notebook for example). Regardless, for the free cost and the desktop version for more intensive additions/edits. Belongings makes any inventory job simple and easy to do. Plus, it’s coming soon to Android and Windows 7 devices.
Disclosure: We might earn commission from qualifying purchases. The commission help keep the rest of my content free, so thank you!


