Those who want to learn Android Programming. This will help you to create a new Android Project in ADT. Android Application is very useful and most popular in mobile programming.
First step of Android programming is how to create android project in ADT. This information helps you to learn step by step to create a new android project in ADT:
Step 1:
Open the Eclipse in ADT bundle. Then on the top of left file menu you have to click on File -> New -> Android Application Project. New window will be open.
Step 2:
When new Android Application window is open. Then you can see there are three blank options for you to fill the project name. From the first column this is your application name it’s depend on user. For example (Application Name is first project)
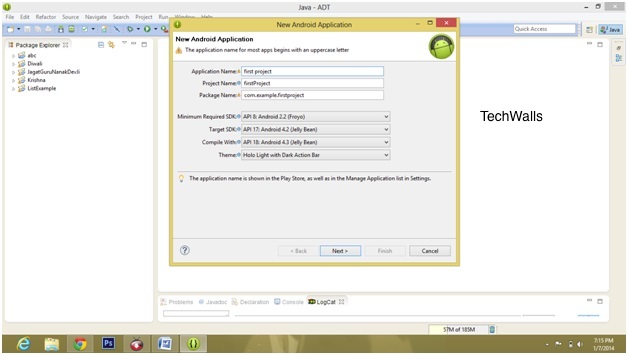
When you fill the Application Name then other fields automatically filled by the same name. User can also change the package name. For example your package name is “com.example.firstproject” and you can also change the package name like “com.abc.firstproject “. Your package name must be unique from all packages installed in your android system.
Step 3:
- Minimum Required SDK: This is the lowest version of Android supports. In other words you can say its lowest API level. No need to change this setting.
- Target SDK: This indicates that highest version of Android also you can say that highest version of API level. When new version is available of android then you should test your android app on new version.
- Compile With: This is latest version of android API level. By default it is set to the latest version of android available in your SDK. This will allows user to enable new features in your android app.
- Theme: This specifies the android user interface style to apply for users android app.
- Click on NEXT.
Step 4:
- Next window is your Configure Project and leave it as it is click on Next.
- Then your next screen can help you to create a launcher icon for your android app. Click on Next.
- In next screen that is your Activity template from which to began building your android app. ( by default it is set as BlankActivity and click Next).
- Leave all default and click finish.
Your project is successfully created.
Hopefully this information is useful for you.
Thank you