Many users install operating systems using a CD/DVD drive rather than through other installation mediums. This is because optical discs for various operating systems are readily available in the market.
However, many operating systems that are downloaded via the internet, are present in the form of an ISO image and require being burned to a CD/DVD or USB drive, (for installing the operating system). The ISO file of Windows 8 64-bit could be downloaded here.
In such a case users also prefer burning an ISO image to a DVD, as it seems more convenient than creating a USB installer. However, the fact is that creating a USB installer can not only save you from using up an optical disc but also speed up the installation process. This is because USBs have a better read/write rate than optical discs like CDs and DVDs. Furthermore, the installer USB can be re-formatted anytime to reuse it for other tasks.
When it comes to creating a bootable USB drive for installing the latest Windows operating system editions i.e. Windows 8 or Windows Server 8, perhaps the best available tool that can be used is Microsoft’s Windows 7 USB/DVD tool (download here). This free application by Microsoft was originally developed for installing Windows 7 and also Windows Server 2008, however due to the similarities of operating system architecture, this tool can also create installer USBs for Windows 8 and Windows Server 8. In fact, we have personally tested and installed both of these operating systems on live machines, using USB installers created with the Windows 7 USB DVD tool. It is also worth mentioning here that many Windows 7 applications are also compatible with Windows 8 and merely require installing some .Net Framework runtimes to make them work. Below is a walkthrough of the procedure involved in the creation of a bootable USB for installing Windows 8 and Windows Server 8. You can use the same procedure to create a bootable installer USB for Windows 7 and Windows Server 2008 (including R2).
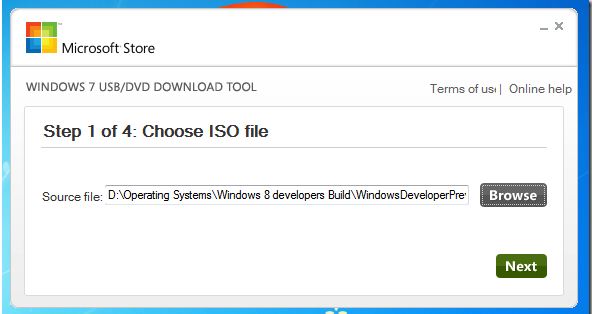
1. In the first step, select the source ISO that is to be burned to the USB. Once selected, click Next to proceed further.

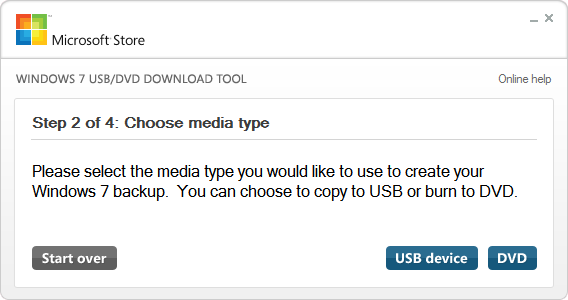
2. It must be noted that this tool can also be used to burn an ISO disc image of supported Windows operating systems. In the next step, click USB Device (or DVD if you want to burn the ISO image to an optical disc).

3. In the third step, select a USB from the drop down menu (in case of multiple attached USBs) and click Begin Copying option.
4. This will start creating the USB installer disc. All data in the USB will be formatted before the file copying process initiates, so make sure that you do not have any sensitive data in the USB, prior to the creation of the USB installer.
5. Once the installation process is complete, you can use the USB for installing the respective operating system by booting your computer from the USB. You might have to change the BIOS settings to make USB the primary booting medium.
Windows 7 USB DVD tool can be installed on:
- Windows XP
- Windows Vista
- Windows 7
- Windows 8
You can create bootable USBs for installing the following operating systems:
- Windows 7
- Windows Server 2008
- Windows 8
- Windows Server 8
Additional requirements:
- 4-GB USB or DVD disc


Johnny Cooper says
hey, really nice tutorial! I didn’t know how to create a bootable USB to install windows 8 on my laptop which does not have a cd-rom but now I know, so thank you!