Bootlloaders of all Android phones are locked by the company when they are first released. For all the fans of custom ROMs, it’s almost a religious obligation to root their phones and unlock the bootloaders as soon as they get their hands on a new phone. “Why should I unlock my bootloader?” is a common question asked by many people who are new to the Android platform.
The answer to this question is really simple. If you are rooting your phone, you are probably doing it to flash a Custom ROM, and if you’re installing a Custom ROM, you need to have your bootloader unlocked. In simple words “Unlocking the bootloader of your Android phone enables you to install custom Firmware“.
Anyone who has unlocked their Android’s bootloader knows that it is not easy to unlock bootloader, but the latest Android phone, Galaxy Nexus, has changed that. The first phone to get the latest firmware from Android, IceCream Sandwich, has a relatively easier process of unlocking the bootloader.

Here a step-by-step guide on how to easily unlock the bootloader of your Galaxy Nexus.
Warning: Unlocking the bootloader voids the phone’s warranty. It also completely wipes (formats) your Android phone’s internal memory including applications, contacts, SMS and MMS messages etc. So, make sure that you have a backup of all your important data before unlocking the bootloader.
Step 1: Install the Android SDK on Your PC
Download and install the Android SDK.
Step 2: Download the Fastboot Tool
For Windows and Mac users, download Flashboot tool. ( Download for Windows, Download for Mac )
Step 3: Place the Fastboot in Proper Folder
Place a fastboot.exe file in your SDK/Tools (or Platform-Tools) folder (same as your adb.exe file) if it is not there already.
Note that you may need to move AdbWinApi.dll into the same folder as your adb.exe and fastboot.exe. Everything must default to SDK/Platform-Tools rather than SDK/Tools in the latest SDK. It depends on the version you are using. The most important thing is to put adb.exe, fastboot.exe, and AdbWinApi.dll into the same folder.
Step 4: Turn On USB Debugging
You will have to turn on USB Debugging. Tap the menu button on your homescreen and select Settings. Look for developer options and once inside, check USB Debugging to turn it on.
Step 5: Connect Galaxy Nexus
Reboot your Galaxy Nexus into Fastboot/Bootloader mode using the following method:
- Turn off the phone.
- Press and hold down the volume-up button and volume-down button at the same time.
- Press the power button.
Step 6: Boot into Fastboot/Bootloader Mode
You must see an Android robot with his front open. Check to see that the text below the robot must start with “FASTBOOT MODE” written in red. Now plug your phone into the computer with the micro USB cable and wait for all the drivers to get installed.
Step 7: Unlock Bootloader
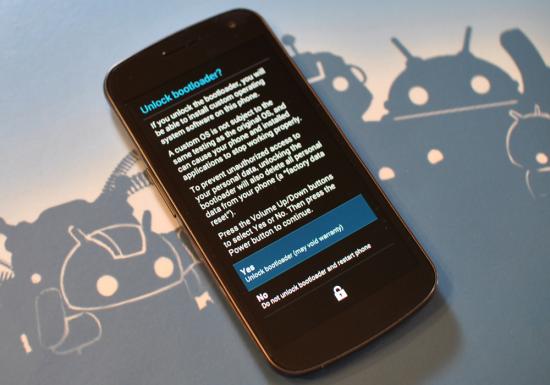
Now open a command line and type “fastboot oem unlock”. The process will be started and you will see the “Unlock Bootloader?” screen on your Galaxy Nexus. Select “Yes (Unlock Bootloader)” using the volume buttons to scroll up and down and press power button to confirm your choice.
[Make sure that you place the fastboot file in the platform-tools folder]
Step 8: Success!
Enjoy the unlocked bootloader.


dore says
please help me!! i tried to do everything in this guid but in step 7, when i write the command, the computer writes “waiting for divice” but nothing happens in the galaxy nexus, it remains in the same state of the fastboot and dont ask me “unlock bootloader?” :(. I guess its because i did the ” INSTALLING ADB/FASTBOOT DRIVERS” guide in here: http://forum.xda-developers.com/showthread.php?t=1392310
can you help me? pleaseee i dont know what to do.. i am new in the android world….
dore says
never mind.. i successfully unlocked my bootloader :))
Tuan Do says
I’m glad as you solved the issue. Could you share with others your steps?
omFg says
And how about stop being one selfish prick and instead of posting that pathetic second reply to your own post, how about telling what did you do to fix it, so other can use your help when needed?!
NCNC says
I guess somebody’s stuck on step 7…
meh says
I’m having trouble with step 7 too. Every time I type in the command it says “fastboot is not recognized as an internal or external command, operable program or batch file”. Please help!
DK says
i am new but love playing with android….. this is great info…. it helped me with installation and flashing yakju on yakjuxw… it working great….
attaching down load link for installation..