Windows 8 is gaining more attraction from Mac users in the U.S. and many more of them are finding ways to install Windows 8 on their Mac devices. In a previous article, I introduced one good solution, which is using the BootCamp application in Mac OS.
That solution is the best way to take advantage of your hardware’s power to run Windows 8, however, there are still some minor problems because Mac OS has not updated drivers for Windows 8 yet. Therefore, I will introduce another way to install Windows 8 on your MacBook, that is using virtual machine. There are some different virtual machine apps that you can use, such as Parallels Desktop, VMware Fusion or Oracle Virtualbox. They all have completed testing of the upgrade to Windows 8 process, so Windows 8, Windows 8 Pro and Windows 8 Enterprise are fully optimized and supported.
The software that I use to illustrate the process is VMware Fusion. As you will have to share hardware resources to the virtual machine, you will need a strong enough Macbook to run it. Your machine should have at least 4GB of RAM and 30GB of free space on hard drive. The performance of Windows 8 on your virtual machine will depend a lot on the allocated memory.
Another requirement is upgrading to the latest version of VMware Fusion, it should be the 5.0 version or above.
Now, just follow some simple steps to install Windows 8 on the virtual machine.
Step 1: Insert your Windows 8 installation disc. Pass this step if you want to install from an ISO image.
Step 2: Open the VMware Fusion application on your Macbook. Go to File->New to create a new virtual machine.
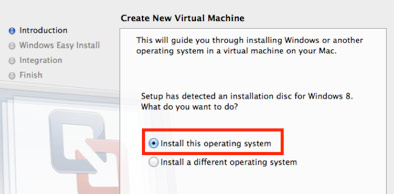
Step 3: On the next screen, select the option “Install this operating system“, click on Continue.

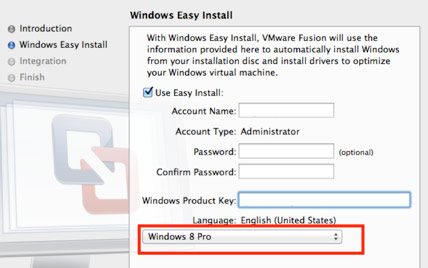
Step 4: The next screen is Windows Easy Install and it is literally easy. Check on the checkbox “Use Easy Install“, then fill in information such as account name, password and Windows product key.
Choose Windows 8 Pro in the drop-down box “Choose your Windows version“.

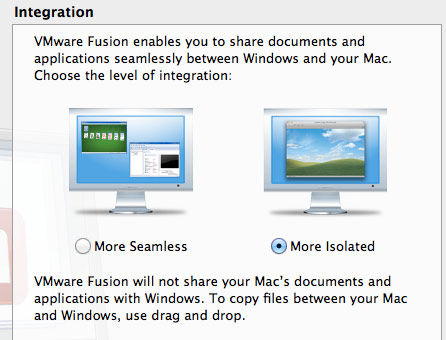
Step 5: On the Integration screen, you will have the two options, More Seamless and More Isolated. Choose the “More Seamless” option if you want to give the virtual machine access to any file on your Mac that Windows can open, so you can edit your files easily but it will increase the risk for Windows viruses to spread. I recommend to go with the “More Isolated” option. It will make the two OSs more separated and you still can edit files very fast by performing drag and drop operations.

Step 6: On the last screen, you will have a chance to review the configuration of your virtual machine. If you want to make any change on memory, disk size, networking or CD/DVD, click on the Customize Settings button.
Click Finish when done and you will be able to run Windows 8 after the installation process complete.
Let us know if you have any issue using Windows 8 on VMware Fusion.


Gerard saliot says
Nice information about installation of windows 8 on macbook.
it’s informative for me. Thanks for sharing……
Chip says
I have it installed on a late 2006 macbook Pro 17″, VMWareFusion runs well, but both Windows 8 and Windows 7 won’t let me see the screen and give me a 3D error…any suggestions?