After playing around with different services to optimize page speed for TechWalls, I decided to come back to my first solution which is MaxCDN.
Once again, I am so impressed with quality of the service and this is the best CDN service for WordPress in my experience. I will talk more about it in the MaxCDN review, this post will just concentrate on setting up MaxCDN on your WordPress website. Compared to Amazon CloudFront CDN, MaxCDN is much simpler and easier to set up. It will take you less than 8 minutes if you follow exactly the following steps:
Step 1: Install W3 Total Cache Plugin
Probably you have already installed the plugin to cache your website. If that’s not the case, go to Dashboard – Plugins to look for the W3 Total Cache Plugin. You must have this plugin to run MaxCDN.
Step 2: Configure the Plugin
Go to Performance (the new item of W3 Total Cache plugin), choose General Settings and start configuring the plugin to work with MaxCDN.
Here you will see a lot of options. Make sure to enable Page Cache and the Page Cache method is Disk:Enhanced, disable Minify, disable Database Cache, enable Object Cache, enable CDN and select MaxCDN for CDN Type. Click on Save all settings.
Note: A lot of tutorials said that we should enable minify, however I had to disable Minify because my site didn’t work properly with this feature enabled.
Step 3: Create a Pull Zone
Now, log in to your MaxCDN account, navigate to Zones and choose Create Pull Zone. A Pull Zone is used to serve ordinary websites, one Pull Zone could serve one website only. A Pull Zone will help accelerate files that are smaller than 10MB like images, javascript or CSS files.
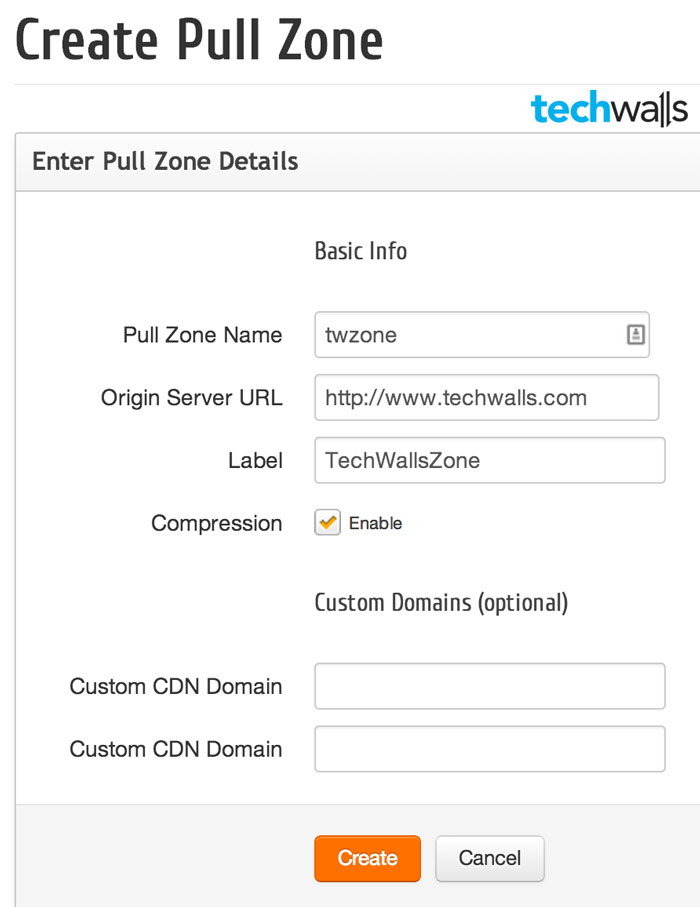
Then, just fill in all the fields and choose custom CDN domain such as cdn.techwalls.com. Click on Create and your zone will be provisioned in a minute. After that, you will be asked to create a CNAME record for your custom CDN domain.
Step 4: CNAME custom CDN domain
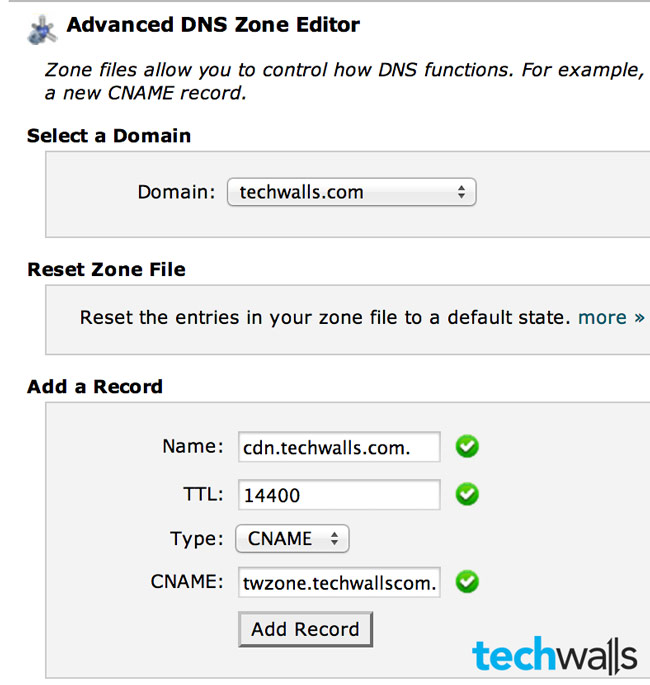
This step will create a CNAME record for your custom CDN domain (cdn.techwalls.com) to point to the hostname of MaxCDN. If you are using a hosting with CPanel, just go to Advanced DNS Zone Editor, select your domain name, and fill in fields in the Add a Record section. Name is the prefix of your custom CDN domain (for example CDN), TTL is set at 14400 (4 hours), Type is CNAME, and CNAME is your temporary CDN domain you received after creating pull zone. Click on Add Record button.
Step 5: CDN settings
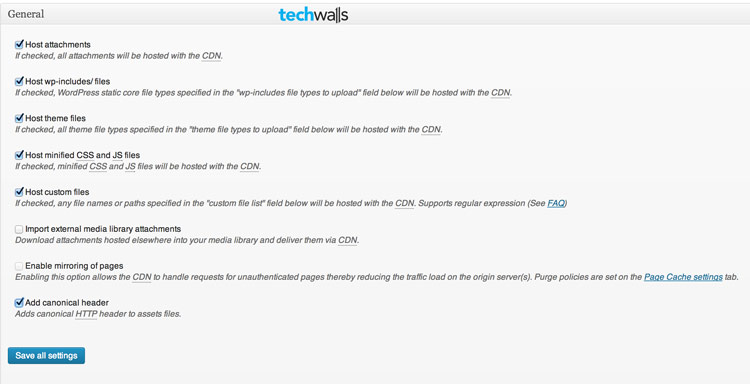
Now come back to the W3 Total Cache plugin, navigate to the CDN tab. In the General section, make sure to check on host attachments, host wp-includes/files, host theme files, host minfied CSS and JS files, host custom files, you can also check on Add canonical header for SEO purpose.
Scroll down, in the Configuration tab, click on Authorize to get authorization key and connect to your MaxCDN account. In the field Replace site’s hostname with, you can fill in your temporary or custom CDN domain (cdn.techwalls.com).
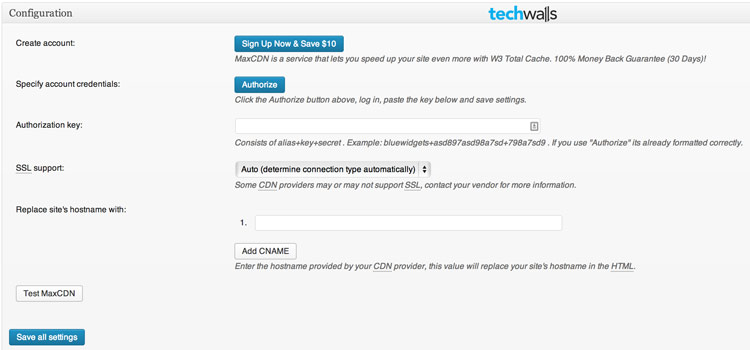
Click on Save all settings and you are all set.
If you have any issue setting up CDN, let me know in the comment section below or you can always contact their 24/7 support.
Disclosure: We might earn commission from qualifying purchases. The commission help keep the rest of my content free, so thank you!


Dmitriy says
Hey guys, nice article.
If anyone has any questions regarding MaxCDN please let me know.
Thanks
Jijin Mohan says
Hello,
Well it’s been like 2 months since I’ve purchased a maxCDN account but never used it as the only reason is ” I though it was hard to setup MAXcdn for wordpress blog. But your guide really helped to understand it correctly.
Thanks
PrIyAnGsHu says
I’ve been using MaxCDN for a while now. It really helps to speed up our sites, I installed it on one of my high traffic sites which was on a shared hosting server and thus had been facing down times pretty often, but after installing MaxCDN, the site’s doing great on the same server. And yeah, thanks for this wonderful, quite useful for beginners.